« Back to the main CS 131 website
Lab 2: Compiling C Programs
Due February 19, 2020, at 8:00PM
Introduction
Until now, you haven’t really had to think about how programs are compiled. In this lab, we’ll dive into the details of how you compile C programs, and how you automate compilation in larger projects that consist of multiple source files.
There are two main C compilers used today: gcc (the GNU C Compiler) and clang (a new compiler from the LLVM compiler framework that for the most part supports more informative error messages). Throughout this lab, you’ll use gcc to get a feel for the compilation process, but feel free to use the clang compiler throughout the course. Once we move to C++, you’ll work with g++ and clang++, which are the C++ equivalents of these compilers.
What is Compiling?
Before we go into the lab, let’s discuss what it means to compile a program into an executable. First of all, what even is an executable? An executable is a special type of file that contains machine instructions (ones and zeros), and running this file causes the computer to perform those instructions. Compiling is the process of turning our C program files into an executable.
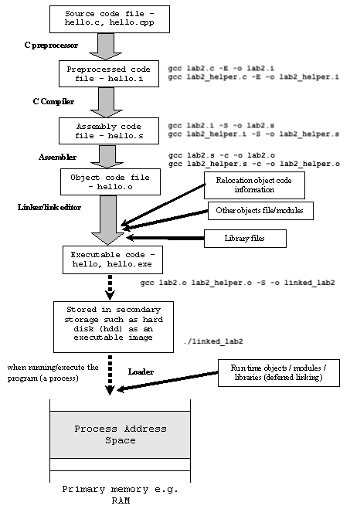
Here is a concrete example (drawn heavily from this article, which goes into much greater detail about the memory map in C). Suppose we want to compile a C program contained in hello.c. The compilation process involves four stages and utilizes different ‘tools’ such as a preprocessor, compiler, assembler, and linker in order to create a final executable.
- Preprocessing is the first pass of any C compilation. It removes comments, expands include-files and macros, and processes conditional compilation instructions. This can be output as a
.i file.
- Compilation is the second pass. It takes the output of the preprocessor, and the source code, and generates assembler source code (
hello.s). Assembly language is a low-level programming language (even lower than C) that is still human-readable but consists of mnemonic instructions that have strong correspondence to machine instructions.
- Assembly is the third stage of compilation. It takes the assembly source code and produces an object file
hello.o, which contains actual machine instructions and symbols (e.g., function names) that are no longer human-readable since they are in bits.
- Linking is the final stage of compilation. It takes one or more object files or libraries as input and combines them to produce a single (usually executable) file. In doing so, it resolves references to external symbols, assigns final addresses to procedures/functions and variables, and revises code and data to reflect new addresses (a process called relocation).
Typically, programmers care most about the final execuable, so the most common usage of gcc compiles a c-file directly into an executable file – internally gcc generates these intermediate outputs and passes them from one stage to another until it produces the executable. Recall running gcc simple_repl.c -o simple_repl in Lab 1 – that’s how we compiled the simple_repl.c program directly into an executable. In this lab, we’ll mainly be working with object and executable files. However, later in the course, you’ll learn more about the assembly intermediate.
What’s the lab about? In addition to being able to turn code into an executable, C compilers also have a variety of flags we can use to customize compilation. In Part 1 of this lab, you’ll use these flags to debug a C program. You’ll hopefully also notice that as C programs get larger, it can become very tedious to compile many files together by hand. In part 2 you’ll write a Makefile to help automate the process of compiling all these files and combining the result into an executable
Assignment installation
First, ensure that your repository has a handout remote. Type:
$ git remote show handout
If this reports an error, run:
$ git remote add handout https://github.com/csci1310/cs131-s20-labs.git
Then run:
$ git pull
$ git pull handout master
This will merge our Lab 2 stencil code with your previous work. If you have any “conflicts” from Lab 1, resolve them before continuing further. Run git push to save your work back to your personal repository.
Note: Any commands in this lab should be run in your course VM.
Part 1: Compiling
In the first part of this lab, you’ll be cleaning up a badly-written C program in lab2.c.
lab2.c: This program is supposed to do two things. First, it takes in two integers as arguments, and then calculates the sum of consecutive numbers from the first integer to the second integer. Second, it uses malloc to allocate some data, and attempts to write to it. This is a very simple program designed to demonstrate various techniques we can use to compile, debug, and optimize our program.
Compilation: To compile a program directly from a c file into an executable, run:
$ gcc lab2.c
If the compiler doesn’t encounter any errors, this will produce an executable file called a.out. In our case, you can run the executable by typing: ./a.out [integer1] [integer2].
However, in most cases you will want to name your executable with a specific name (rather than a.out). In projects that contain many different executables, names are a good way to keep track of which executable has which functionality.
Compile with a name: The -o flag allows you to place the output of any gcc program into the file specified by the argument immediately following the flag. To compile your c file with the filename that you want, type:
$ gcc lab2.c -o <executable-name>
Task: Compile lab2.c and name your executable lab2. If you run the program as follows you should see this output:
$ ./lab2 10 100
Arithmetic Sum between 10 and 100 is: 100.
Malloc'd data for arg1 (0) and arg2 (0).
In the next few steps of the lab, we’ll see how flags can help us quickly identify bugs with lab2.c.
Flags
The gcc compiler supports the use of hundreds of different flags, which we can use to customize the compilation process. Flags, typically prefixed by a dash or two (-<flag> or --<flag>), can help us in many ways from warning us about programming errors to optimizing our code so that it runs faster.
In this section, you’ll use the flags to find bugs in lab2.c and improve the performance of the lab2 executable. The general structure for compiling a program with flags is:
$ gcc <flags> <c-file> -o <executable-name>
Warning Flags:
1. -Wall
One of the most common flags is the -Wall flag. It will cause the compiler to warn you about technically legal but potentially problematic syntax, including:
- uninitialized and unused variables
- incorrect return types
- invalid type comparisons
Task: Compile lab2.c with the -Wall flag. To do this, type:
gcc -Wall lab2.c -o lab2
- You’ll see a warning appear here. Warnings differ from errors in that warnings won’t actually prevent you from compiling your code, while errors will.
2. -Werror
The -Werror flag forces the compiler to treat all compiler warnings as errors, meaning that your code won’t be compiled until you fix the errors. This may seem annoying at first, but in the long run, it can save you lots of time by forcing you to take a look at potentially problematic code.
Task: Add the -Werror flag when compiling lab2.c. To do this, type:
gcc -Wall -Werror lab2.c -o lab2
This flag adds a few more warnings (which will appear as errors thanks to -Werror) not covered by -Wall. Some problems that -Wextra will warn you about include:
- assert statements that always evaluate to true because of the datatype of the argument
- unused function parameters (only when used in conjunction with
-Wall)
- empty if/else statements
Task: Add the -Wextra flag when compiling lab2.c, and fix the errors that come up according to the specifications in the comments. If you fixed the errors, your output should look something like this:
$ ./lab2
Invalid number of arguments.
$ ./lab2 5 100
Arithmetic Sum between 5 and 100 is: 4940.
Malloc'd data for arg1 (0) and arg2 (0).
What's `argc` supposed to do?
argc indicates the number of arguments passed into the program.
- Use this variable to ensure that users pass in the expected number of arguments and print an error otherwise. Check out Lecture 2 for more examples.
- Make sure to return
1 from main on an error, so that the OS can detect that your program exited with errors.
Debugging with Sanitizers
Your program may appear to be bug-free now, but there are still some hidden bugs. For instance, try running the following command. The output should look a little fishy 
./lab2 100 10000000
As helpful as warning flags are, there are some errors that they can’t catch. These include errors like memory leaks, stack or heap corruption, and cases of undefined behaviors – problems that aren’t immediately obvious but can cause serious bugs in your code. This is where sanitizers comes in! Address sanitizers sacrifice efficiency to add additional checks to your code. They run along with your program to perform analysis, which is why adding sanitizers slows down your program.
Here are some helpful debugging and sanitizer flags:
Rember using this flag in Lab 1? This flag requests the compiler to generate and embed debugging information in the executable, especially the source code. This provides more specific debugging information when you’re running your executable with gdb or address sanitizers!
This flag enables the AddressSanitizer program, which is a memory error detector developed by Google. This can detect bugs such as out-of-bounds access to heap / stack / global variables, and dangling pointers (using a pointer after the object being pointed to is freed). In practice, this flag also adds another sanitizer, the LeakSanitizer, which detects memory leaks (also available via -fsanitize=leak).
This flag enables the UndefinedBehaviorSanitizer program. It can detect and catch various kinds of undefined behavior during program execution, such as using null pointers, or signed integer overflow.
Task: Add the three flags above to your compilation, and then run the lab2 executable to find and fix any errors that comes up. If you fixed the errors, you should see the following output.
$ ./lab2 0 2147483647
Arithmetic Sum between 0 and 2147483647 is: 2305843005992468481.
Malloc'd data for arg1 (0) and arg2 (2147483647).
Note: the errors will appear when you run the program
Hint
Feel free to change the datatype that arithmeticSum returns, so that there’s enough space for the largest possible arithmetic summation between two integers.
Interpretting Address Sanitizer Output
The address sanitizers often print out errors like the image below with some variation:

Note:You can click on the image to get a closer look.
There is a lot of information that gets dumped out, but don’t panic. Here’s what’s happening!
The top block: This indicates what error has occurred, what caused it, and when it occured.
- Red message (What error occured?): This says that we caused a heap buffer overflow.
- Blue message (What caused the error?): This indicates that our error was specifically caused by writing 4 bytes in the heap.
- Stack Trace (When did the error occur?): This tells us the exact line number that performs this write (line 43 in
lab2.c). This refers to the line at which we attempted to write an integer (4 bytes) into our malloc’d array.
The bottom block: This message gives us more information about the allocated block that is nearest to the data we’re trying to access.
- Bright green message (Where was the nearest block allocated?): It’s telling us that the region we were trying to access is 0 bytes to the right of an 8-byte region we allocated (that’s the integer array we allocated for 2 integers).
- Stack Trace (When did the error occur?): This indicates that the memory region was allocated on line 41 in
lab2.c.
Note: keep in mind that depending on how you fixed previous compilation issues, these line numbers may vary.
Optimization Flags
In addition to flags that let you know about problems in your code, there are also optimization flags that will speed up the runtime of your code at the cost of longer compilation times. Higher optimization levels will optimize by running analyses on your program to determine if the compiler can make certain changes that improve its speed. The higher the optimization level, the longer the compiler will take to compile the program, because it performs more sophisticated analyses on your program. These are the capital O flags, which include -O, -O2, -O3, and -Os.
This will compile your code without optimizations – it’s equivalent to not specifying the -O option at all. Because higher optimization levels will often remove and modify portions of your original code, it’s best to use this flag when you’re debugging with gdb or address sanitizers.
This will enable the most aggressive optimizations, making your code run fastest.
- You can read up on the other optimization flags here.
Task: Time your program before you add the -O3 flag and then after you’ve added the -O3 flag to your compilation, and notice the difference in speed.
- You should remove the
-g and the address sanitizing flags as these will slow down your program due to the additional debugging information they add.
- In this case, the
-O3 flag will ask the compiler to examine what the arithmeticSum function is trying to do and rather than following the provided code verbatim it will replace it with assembly instructions that functionally do the same thing, but in a more efficient manner.
- You can time your program by running the
time command in your vagrant instance. For this exercise, pay attention to the real time, but if you’re curious about the different types of times below, check out this post.
$ time ./lab2 100 1000000000
Arithmetic Sum between 100 and 1000000000 is: 499999999499995050.
Malloc'd data for arg1 (100) and arg2 (1000000000).

real	0m0.210s
user	0m0.199s
sys	0m0.010s
Part 2: Makefiles
You now know how to compile C programs! This is great, but unfortunately actual projects are not so simple. In the real world, you may run into situations where you have to compile many source files and use specific sets of flags. It’s very easy to forget a flag or source file, and doing this all by hand on the command line is time-consuming. Additionally, when you have many source files, it can be annoying to individually recompile/relink each source file when you make a change to it.
This is why the make tool was created! Running the make tool will read a file called the Makefile for specifications on how to compile and link a program. A well-written Makefile automates all the complicated parts of compilation, so you don’t have to remember each step. Additionally, they can do tasks other than just program compilation — they can execute any shell command we provide.
A Makefile consists of one or more rules. The basic structure of a Makefile rule is:
<target>: <dependencies>
[ tab ]<shell_command>
- The target is the name of an output file generated by this rule, or a rule label that you choose in certain special cases.
- The dependencies are the files or other targets that this target depends on.
- The shell command is the command you want to run when the target or dependencies are out of date.
- General Rules:
- From gnu.org: A target is out of date if it does not exist or if it is older than any of the dependencies (by comparison of last-modification times). The idea is that the contents of the target file are computed based on information in the dependencies, so if any of the dependencies changes, the contents of the existing target file are no longer necessarily valid.
- If a target is out of date, running
make <target> will first remake any of its target dependencies and then run the <shell_command>.
- In general, the name of the Makefile target should be the same as the name of the output file, because then running
make <target> will rebuild the target when the output file is older than its dependencies.
A simple Makefile that compiles lab2.c would look like this:
lab2: lab2.c
    gcc lab2.c -o lab2
To compile lab2.c using this Makefile, you would type:
$ make lab2
This will cause the Makefile to run the lab2 target, which will execute the command gcc lab2.c -o lab2 if a lab2 executable doesn’t exist or if the lab2 executable is older than lab2.c. Notice how this only works properly if the name of the output executable is the same as the target name.
Task:
- Create an empty Makefile by typing
touch Makefile in your directory.
- Modify your Makefile so that it has one target,
lab2, that will compile lab2.c with all the warning flags discussed in Part 1 of this lab.
- Run
make lab2 to make sure it compiles successfully. (You may need to delete the lab2 binary via rm lab2 to make this work.)
Note: Don’t worry about errors with the ‘modification time’ or ‘clock’. These occur because the clock in your VM’s internal clock differs from your actual machine’s clock, but shouldn’t cause any big issues with our compilation process.
Now, what if we want to create multiple targets? We can use variables to simplify our Makefile even more!
Variables
Makefiles support defining variables, so that you can reuse flags and names you commonly use. MY_VAR = "something" will define a variable that can be used as $(MY_VAR) or ${MY_VAR} in your rules. A common way to define flags for C program compilation is to have a CFLAGS variable that you include whenever you run gcc. For example, you can then rewrite your target like this:
CFLAGS = -Wall -Werror
lab2: lab2.c
    gcc $(CFLAGS) lab2.c -o lab2
Automatic Variables: Additionally, there are special variables called automatic variables that can have a different value for each rule in a Makefile and are designed to make writing rules simpler. Keep in mind that they can only be used in the command portion of a rule.
Here are some common automatic variables:
$@ represents the name of the current rule’s target.$^ represents the names of all of the current rule’s dependencies, with spaces in between.$< represents the name of the current rule’s first dependency.
If we wanted to stop using lab2.c and lab2 to avoid repetitiveness, we could rewrite our target like this:
CFLAGS = -Wall -Werror
lab2: lab2.c
    gcc $(CFLAGS) $< -o $@
Task: Using regular and automatic variables to simplify your Makefile, replace your lab2 target with the two new targets:
fast_lab2, which compiles lab2.c with the -O3 flag and the three warning flags discussed above.debug_lab2, which compiles lab2.c with the -g flag (used for generating information that a debugger like gdb can use), the address sanitizer flags, and the three warning flags.
Phony Targets
There are also targets known as ‘phony’ targets. These are targets that themselves create no files, but rather exist to provide shortcuts for doing other common operations, like making all the targets in our Makefile or getting rid of all the executables that we made.
To mark targets as phony, you need to include this line before any targets in your Makefile:
.PHONY: [target1] [target2] [etc.]
Why do we need to declare a target as phony?
- To avoid a conflict with a file of the same name: We learned earlier that targets will only execute their
<shell_command> if the target file is out-of-date. This is problematic because phony targets generally don’t create files under the target name. If somehow there exists a file under the same name as a phony target, the phony target’s command will never be run. You can avoid this by explicitly declaring a target as phony to specify to the make tool to rebuild the target even if it’s not “out-of-date”.
- To improve performance: there’s also a more advanced performance advantage that you can learn more about here.
Here are some common phony targets that we’ll be using in this course:
-
all target
We use the all target to make all of the executables (targets) in our project simultaneously. This is what it generally looks like:
all: target1 target2 target3
As you can see, there are no shell commands associated with the all target. In fact, we don’t need to include shell commands for all, because by including each target (target1, target2, target3) as dependencies for the all target, the Makefile will automatically build those targets in order to fulfill the requirements of all.
In other words, since the all target depends on all the executables in a project, building the all target causes make to first build every other target in our Makefile.
-
clean target
We also have a target for getting rid of all the executables (and other files we created with make) in our project. This is the clean target.
The clean target generally looks like this:
clean:
    rm -f exec1 exec2 obj1.o obj2.o
As you can see, the clean target is fundamentally just a shell command to remove all the executables and object files that we made earlier. By convention, the clean target should remove all content automatically generated by make. It has no dependencies, because we don’t care whether we’ve previously built the different executables in our project. All we want to do with make clean is to clean up those we did make.
Note: Be careful which files you put after the rm -f command, as they will be deleted when you run make clean.
-
In this class, you will notice that all of the Makefiles will also contain a format target, which use a command called clang-format to style your .c and .h files following a specified standard. A typical format command would look like this:
format:
    clang-format -style=Google -i <file1>.h <file2>.c ...
The above command will format any listed files according to the Google specification.
Note: When using this, keep in mind the order of your #include files. Formatting might change the order of include statements. This is something to consider if, for example, you are importing a header file that relies on standard libraries from the file you’re importing it in. To avoid this make sure that your header files are self-contained.
check target
You’ll also notice a check target in the Makefiles we provide. You won’t need to create this target in this lab, but in projects this target will be a shortcut for running the testsuite.
Task: Add all, clean, and format targets to your Makefile.
- Running
make without any targets will run the first target in your Makefile. Consequently, you should place the all target as the first target so that typing make will automatically generate all the executables.
- Don’t forget to mark these targets as phony!
Simplifying Linking
Recall from the beginning of this lab that linking is process of combining many object files and libraries into a single (usually executable) file. To better understand this, let’s call a function from lab2_helper.c in lab2.c.
Task: Call the helperFunction function from lab2_helper.c in lab2.c. Here’s what we need to do:
- Add the statement
#include "lab2_helper.h" at the top of lab2.c in order to use the helperFunction function.
- Call the
helperFunction function from lab2_helper.c in the main function of lab2.c using arg1 and arg2 as its arguments. Please call this function after the “Malloc’d data for…” print statement
One way we could compile these two .c files into a single executable is:
$ gcc lab2.c lab2_helper.c -o lab2
In the processs, gcc creates two separate .o files – one for lab2.c and one for lab2_helper.c and then links them together.
Large vs. Small Projects: For small projects, this works well. However, for large projects it can be faster to generate intermediate .o files and then separately link the .o files together into an executable.
Why? Imagine a project that generates two shared libraries and four executables, all of which separately link a file called data.c. Lets say the data.o file takes 1 second to compile. If you compile and link each executable in one command (without creating intermediate .o files), gcc will rebuild the data.o file five times, resulting in 5 seconds of build time. If you separately build the data.o file, you’ll build the data.c file only once (taking 1 second) and then link it (which is much faster than compiling from scratch, especially with large source files).
Although this technique won’t demonstrate a huge performance benefit in the case of our small lab, let’s try this to drive the concept of linking home. We can then use our Makefile to automate this process for us, so that we don’t have to regenerate all object and source files every time we edit one of them.
To do this, we need to first generate object files for each file, containing the machine instructions. Then we need to link these programs together into one executable.
To create the object files without linking them, we use the -c flag when running gcc. For example, to create object files for lab2.c and lab2_helper.c, we would run:
$ gcc <flags> -c lab2.c -o lab2.o
$ gcc <flags> -c lab2_helper.c -o lab2_helper.o
This will generate lab2.o and lab2_helper.o files.
Then, to link the object files into an executable, we would run:
$ gcc lab2.o lab2_helper.o -o <executable name>
The advantage of creating object files independently is that when a source file is changed, we only need to create the object file for that source file. For example, if we changed lab2_helper.c, we would just have to run gcc -c lab2_helper.c -o lab2_helper.c to get the object file, and then gcc lab2_helper.o lab2.o to get the final executable.
Task: In your Makefile, create targets for fast_lab2.o, debug_lab2.o, fast_lab2_helper.o, and debug_lab2_helper.o, that each include the corresponding source file as a dependency.
- Each of these targets should compile their source file into an object file (not an executable). They also need their correct flags for either optimization or debugging.
- Update your
fast_lab2 and debug_lab2 targets to use the .o flags. Keep the respective flags for optimization and debugging
- Update your
clean and format targets.
Thanks to this, make will only recompile each individual object file if that file’s source was changed. It may not make the biggest difference for this lab, but in a larger project doing this will save you lots of time.
Pattern Rules
The last Makefile technique we’ll discuss are pattern rules. These are very commonly used in Makefiles. A pattern rule uses the % character in the target to create a general rule. As an example:
- The
% will match any non empty substring in the target, and the % used in dependencies will substitute the target’s matched string.
- In this case, this will specify how to make any
file_<n> executable with another file called<n>.c as a dependency. If <n>.c doesn’t exist or can’t be made this will throw an error.
- For instance, if we were to remove the
helperFunction code and the lab2_helper.h include statement from lab2.c, we would be able to use this rule by running make file_lab2 to create a file_lab2 executable from lab2.c.
Task: Use pattern rules to simplify your Makefile targets such that you can generate fast_lab2.o, debug_lab2.o, fast_lab2_helper.o, and debug_lab2_helper.o using only 2 rules rather than 4 seperate rules.
If you need help, this documentation might help.
You’ve now been introduced to a few of the most popular gcc flags and Makefile techniques. For most assignments in this course, you won’t need to write your own Makefile, but if you ever encounter compilation errors, hopefully, it will now be easier to understand what’s happening. Try taking a look at the strings assignment part of Project 1’s Makefile. There may be some new flags that you might want to look up online, but for the most part you should be able to understand how it’s compiling your C source files!
You are now ready to hand in this lab 
Handin instructions
Turn in your code by pushing your git repository to github.com/csci1310/cs131-s20-labs-YOURNAME.git.
Then, head to the grading server. On the “Labs” page, use the “Lab 2 checkoff” button to check off your lab.
« Back to the main CS 131 website
Lab 2: Compiling C Programs
Due February 19, 2020, at 8:00PM
Introduction
Until now, you haven’t really had to think about how programs are compiled. In this lab, we’ll dive into the details of how you compile C programs, and how you automate compilation in larger projects that consist of multiple source files.
There are two main C compilers used today:
gcc(the GNU C Compiler) andclang(a new compiler from the LLVM compiler framework that for the most part supports more informative error messages). Throughout this lab, you’ll usegccto get a feel for the compilation process, but feel free to use theclangcompiler throughout the course. Once we move to C++, you’ll work withg++andclang++, which are the C++ equivalents of these compilers.What is Compiling?
Before we go into the lab, let’s discuss what it means to compile a program into an executable. First of all, what even is an executable? An executable is a special type of file that contains machine instructions (ones and zeros), and running this file causes the computer to perform those instructions. Compiling is the process of turning our C program files into an executable.
Here is a concrete example (drawn heavily from this article, which goes into much greater detail about the memory map in C). Suppose we want to compile a C program contained in
hello.c. The compilation process involves four stages and utilizes different ‘tools’ such as a preprocessor, compiler, assembler, and linker in order to create a final executable..ifile.hello.s). Assembly language is a low-level programming language (even lower than C) that is still human-readable but consists of mnemonic instructions that have strong correspondence to machine instructions.hello.o, which contains actual machine instructions and symbols (e.g., function names) that are no longer human-readable since they are in bits.Typically, programmers care most about the final execuable, so the most common usage of
gcccompiles a c-file directly into an executable file – internallygccgenerates these intermediate outputs and passes them from one stage to another until it produces the executable. Recall runninggcc simple_repl.c -o simple_replin Lab 1 – that’s how we compiled thesimple_repl.cprogram directly into an executable. In this lab, we’ll mainly be working with object and executable files. However, later in the course, you’ll learn more about the assembly intermediate.What’s the lab about? In addition to being able to turn code into an executable, C compilers also have a variety of flags we can use to customize compilation. In Part 1 of this lab, you’ll use these flags to debug a C program. You’ll hopefully also notice that as C programs get larger, it can become very tedious to compile many files together by hand. In part 2 you’ll write a Makefile to help automate the process of compiling all these files and combining the result into an executable
Assignment installation
First, ensure that your repository has a
handoutremote. Type:$ git remote show handoutIf this reports an error, run:
$ git remote add handout https://github.com/csci1310/cs131-s20-labs.gitThen run:
$ git pull $ git pull handout masterThis will merge our Lab 2 stencil code with your previous work. If you have any “conflicts” from Lab 1, resolve them before continuing further. Run
git pushto save your work back to your personal repository.Note: Any commands in this lab should be run in your course VM.
Part 1: Compiling
In the first part of this lab, you’ll be cleaning up a badly-written C program in
lab2.c.lab2.c: This program is supposed to do two things. First, it takes in two integers as arguments, and then calculates the sum of consecutive numbers from the first integer to the second integer. Second, it usesmallocto allocate some data, and attempts to write to it. This is a very simple program designed to demonstrate various techniques we can use to compile, debug, and optimize our program.Compilation: To compile a program directly from a c file into an executable, run:
$ gcc lab2.cIf the compiler doesn’t encounter any errors, this will produce an executable file called
a.out. In our case, you can run the executable by typing:./a.out [integer1] [integer2].However, in most cases you will want to name your executable with a specific name (rather than
a.out). In projects that contain many different executables, names are a good way to keep track of which executable has which functionality.Compile with a name: The
-oflag allows you to place the output of any gcc program into the file specified by the argument immediately following the flag. To compile your c file with the filename that you want, type:$ gcc lab2.c -o <executable-name>Task: Compile
lab2.cand name your executablelab2. If you run the program as follows you should see this output:$ ./lab2 10 100 Arithmetic Sum between 10 and 100 is: 100. Malloc'd data for arg1 (0) and arg2 (0).In the next few steps of the lab, we’ll see how flags can help us quickly identify bugs with
lab2.c.Flags
The gcc compiler supports the use of hundreds of different flags, which we can use to customize the compilation process. Flags, typically prefixed by a dash or two (
-<flag>or--<flag>), can help us in many ways from warning us about programming errors to optimizing our code so that it runs faster.In this section, you’ll use the flags to find bugs in
lab2.cand improve the performance of thelab2executable. The general structure for compiling a program with flags is:$ gcc <flags> <c-file> -o <executable-name>Warning Flags:
1.
-WallTask: Compile
lab2.cwith the-Wallflag. To do this, type:gcc -Wall lab2.c -o lab22.
-WerrorTask: Add the
-Werrorflag when compilinglab2.c. To do this, type:gcc -Wall -Werror lab2.c -o lab23.
-WextraTask: Add the
-Wextraflag when compilinglab2.c, and fix the errors that come up according to the specifications in the comments. If you fixed the errors, your output should look something like this:$ ./lab2 Invalid number of arguments. $ ./lab2 5 100 Arithmetic Sum between 5 and 100 is: 4940. Malloc'd data for arg1 (0) and arg2 (0).What's `argc` supposed to do?
argcindicates the number of arguments passed into the program.1from main on an error, so that the OS can detect that your program exited with errors.Debugging with Sanitizers
Your program may appear to be bug-free now, but there are still some hidden bugs. For instance, try running the following command. The output should look a little fishy
As helpful as warning flags are, there are some errors that they can’t catch. These include errors like memory leaks, stack or heap corruption, and cases of undefined behaviors – problems that aren’t immediately obvious but can cause serious bugs in your code. This is where sanitizers comes in! Address sanitizers sacrifice efficiency to add additional checks to your code. They run along with your program to perform analysis, which is why adding sanitizers slows down your program.
Here are some helpful debugging and sanitizer flags:
-g-fsanitize=address-fsanitize=undefinedTask: Add the three flags above to your compilation, and then run the
lab2executable to find and fix any errors that comes up. If you fixed the errors, you should see the following output.$ ./lab2 0 2147483647 Arithmetic Sum between 0 and 2147483647 is: 2305843005992468481. Malloc'd data for arg1 (0) and arg2 (2147483647).Note: the errors will appear when you run the program
Hint
Feel free to change the datatype that
arithmeticSumreturns, so that there’s enough space for the largest possible arithmetic summation between two integers.Interpretting Address Sanitizer Output
The address sanitizers often print out errors like the image below with some variation:
Note:You can click on the image to get a closer look.
There is a lot of information that gets dumped out, but don’t panic. Here’s what’s happening!
The top block: This indicates what error has occurred, what caused it, and when it occured.
The bottom block: This message gives us more information about the allocated block that is nearest to the data we’re trying to access.
Note: keep in mind that depending on how you fixed previous compilation issues, these line numbers may vary.
Optimization Flags
In addition to flags that let you know about problems in your code, there are also optimization flags that will speed up the runtime of your code at the cost of longer compilation times. Higher optimization levels will optimize by running analyses on your program to determine if the compiler can make certain changes that improve its speed. The higher the optimization level, the longer the compiler will take to compile the program, because it performs more sophisticated analyses on your program. These are the capital
Oflags, which include-O,-O2,-O3, and-Os.-O0-O3Task: Time your program before you add the
-O3flag and then after you’ve added the-O3flag to your compilation, and notice the difference in speed.-gand the address sanitizing flags as these will slow down your program due to the additional debugging information they add.-O3flag will ask the compiler to examine what thearithmeticSumfunction is trying to do and rather than following the provided code verbatim it will replace it with assembly instructions that functionally do the same thing, but in a more efficient manner.timecommand in your vagrant instance. For this exercise, pay attention to the real time, but if you’re curious about the different types of times below, check out this post.Part 2: Makefiles
You now know how to compile C programs! This is great, but unfortunately actual projects are not so simple. In the real world, you may run into situations where you have to compile many source files and use specific sets of flags. It’s very easy to forget a flag or source file, and doing this all by hand on the command line is time-consuming. Additionally, when you have many source files, it can be annoying to individually recompile/relink each source file when you make a change to it.
This is why the
maketool was created! Running themaketool will read a file called theMakefilefor specifications on how to compile and link a program. A well-written Makefile automates all the complicated parts of compilation, so you don’t have to remember each step. Additionally, they can do tasks other than just program compilation — they can execute any shell command we provide.A Makefile consists of one or more rules. The basic structure of a Makefile rule is:
A simple Makefile that compiles
lab2.cwould look like this:To compile
lab2.cusing this Makefile, you would type:$ make lab2Task:
touch Makefilein your directory.lab2, that will compilelab2.cwith all the warning flags discussed in Part 1 of this lab.make lab2to make sure it compiles successfully. (You may need to delete thelab2binary viarm lab2to make this work.)Note: Don’t worry about errors with the ‘modification time’ or ‘clock’. These occur because the clock in your VM’s internal clock differs from your actual machine’s clock, but shouldn’t cause any big issues with our compilation process.
Now, what if we want to create multiple targets? We can use variables to simplify our Makefile even more!
Variables
Makefiles support defining variables, so that you can reuse flags and names you commonly use.
MY_VAR = "something"will define a variable that can be used as$(MY_VAR)or${MY_VAR}in your rules. A common way to define flags for C program compilation is to have aCFLAGSvariable that you include whenever you rungcc. For example, you can then rewrite your target like this:Automatic Variables: Additionally, there are special variables called automatic variables that can have a different value for each rule in a Makefile and are designed to make writing rules simpler. Keep in mind that they can only be used in the command portion of a rule.
If we wanted to stop using
lab2.candlab2to avoid repetitiveness, we could rewrite our target like this:Task: Using regular and automatic variables to simplify your Makefile, replace your lab2 target with the two new targets:
fast_lab2, which compileslab2.cwith the-O3flag and the three warning flags discussed above.debug_lab2, which compileslab2.cwith the-gflag (used for generating information that a debugger like gdb can use), the address sanitizer flags, and the three warning flags.Phony Targets
There are also targets known as ‘phony’ targets. These are targets that themselves create no files, but rather exist to provide shortcuts for doing other common operations, like making all the targets in our Makefile or getting rid of all the executables that we made.
To mark targets as phony, you need to include this line before any targets in your Makefile:
Here are some common phony targets that we’ll be using in this course:
alltargetWe use the
alltarget to make all of the executables (targets) in our project simultaneously. This is what it generally looks like:cleantargetWe also have a target for getting rid of all the executables (and other files we created with
make) in our project. This is thecleantarget.The
cleantarget generally looks like this:Note: Be careful which files you put after the
rm -fcommand, as they will be deleted when you runmake clean.formattargetIn this class, you will notice that all of the Makefiles will also contain a
formattarget, which use a command calledclang-formatto style your.cand.hfiles following a specified standard. A typical format command would look like this:Note: When using this, keep in mind the order of your
#includefiles. Formatting might change the order of include statements. This is something to consider if, for example, you are importing a header file that relies on standard libraries from the file you’re importing it in. To avoid this make sure that your header files are self-contained.checktargetYou’ll also notice a
checktarget in the Makefiles we provide. You won’t need to create this target in this lab, but in projects this target will be a shortcut for running the testsuite.Task: Add
all,clean, andformattargets to your Makefile.makewithout any targets will run the first target in your Makefile. Consequently, you should place thealltarget as the first target so that typingmakewill automatically generate all the executables.Simplifying Linking
Recall from the beginning of this lab that linking is process of combining many object files and libraries into a single (usually executable) file. To better understand this, let’s call a function from
lab2_helper.cinlab2.c.Task: Call the
helperFunctionfunction fromlab2_helper.cinlab2.c. Here’s what we need to do:#include "lab2_helper.h"at the top oflab2.cin order to use thehelperFunctionfunction.helperFunctionfunction fromlab2_helper.cin themainfunction oflab2.cusingarg1andarg2as its arguments. Please call this function after the “Malloc’d data for…” print statementOne way we could compile these two
.cfiles into a single executable is:$ gcc lab2.c lab2_helper.c -o lab2Large vs. Small Projects: For small projects, this works well. However, for large projects it can be faster to generate intermediate
.ofiles and then separately link the.ofiles together into an executable.Although this technique won’t demonstrate a huge performance benefit in the case of our small lab, let’s try this to drive the concept of linking home. We can then use our Makefile to automate this process for us, so that we don’t have to regenerate all object and source files every time we edit one of them.
To do this, we need to first generate object files for each file, containing the machine instructions. Then we need to link these programs together into one executable.
To create the object files without linking them, we use the
-cflag when runninggcc. For example, to create object files forlab2.candlab2_helper.c, we would run:This will generate
lab2.oandlab2_helper.ofiles.Then, to link the object files into an executable, we would run:
Task: In your Makefile, create targets for
fast_lab2.o,debug_lab2.o,fast_lab2_helper.o, anddebug_lab2_helper.o, that each include the corresponding source file as a dependency.fast_lab2anddebug_lab2targets to use the.oflags. Keep the respective flags for optimization and debuggingcleanandformattargets.Thanks to this,
makewill only recompile each individual object file if that file’s source was changed. It may not make the biggest difference for this lab, but in a larger project doing this will save you lots of time.Pattern Rules
The last Makefile technique we’ll discuss are pattern rules. These are very commonly used in Makefiles. A pattern rule uses the
%character in the target to create a general rule. As an example:Task: Use pattern rules to simplify your Makefile targets such that you can generate
fast_lab2.o,debug_lab2.o,fast_lab2_helper.o, anddebug_lab2_helper.ousing only 2 rules rather than 4 seperate rules.If you need help, this documentation might help.
You’ve now been introduced to a few of the most popular
gccflags and Makefile techniques. For most assignments in this course, you won’t need to write your own Makefile, but if you ever encounter compilation errors, hopefully, it will now be easier to understand what’s happening. Try taking a look at the strings assignment part of Project 1’s Makefile. There may be some new flags that you might want to look up online, but for the most part you should be able to understand how it’s compiling your C source files!You are now ready to hand in this lab
Handin instructions
Turn in your code by pushing your git repository to
github.com/csci1310/cs131-s20-labs-YOURNAME.git.Then, head to the grading server. On the “Labs” page, use the “Lab 2 checkoff” button to check off your lab.